We have all dreamed of having a virtual assistant to help us complete our tasks at some point. This wish has been reflected in books, science fiction movies, and various types of games throughout time.
To our surprise, this option is now available to the general public, albeit in a limited way compared to what our imagination has conjured in the realm of science fiction. However, the path is clear and set; I think we all know where it’s leading us, or at least where we hope it will take us.
It’s safe to say that we all want an AI that does everything for us, except for making decisions that affect the final outcome. Essentially, we tell the AI what we want and expect everything that comes with it to unfold without us needing to know how it was developed. Of course, we want the development process to be available for analysis, but only when necessary.
What I’ve described is already possible, keeping in mind that it is still subject to the inherent limitations of current technological advancements, which will undoubtedly improve. This technology is referred to as “Generative Artificial Intelligence,” or Gen AI for short.
What is Generative AI?
Generative artificial intelligence (Generative AI) is a type of AI that has the capability to create new and original content, such as text, images, music, and other types of media. It operates using advanced algorithms that analyze and learn from large datasets to produce new outputs that are coherent and relevant to those data.
Some examples of generative AI include:
Language models: Like GPT, which can write text, answer questions, or hold conversations.
Generative adversarial networks (GANs): Used to create realistic images from initial noise.
Generative music: Algorithms that can compose original musical pieces.
Although it is still relatively new (to the general public), generative AI is already being used in various applications, from creating art to writing scripts and even designing products. It is revolutionizing many creative and industrial fields.
For people like me, who work with technology day in and day out, it is a tremendous advantage because it saves us a significant amount of time when looking for information about a specific tool, how to use it, and even generating the design and logic needed to achieve our goals. Again, I want to emphasize that, due to our expertise in the field, we know what we want and what we need to do to solve the problem. With this in mind, we simply write the instructions and await the outcome. This is referred to as entering the “prompt” into the generative AI interface (whatever it may be). The more detailed and concise the prompt, the better the desired result will be.
The process described above works for a regular user who inputs a request and receives a result. But what happens when we need to incorporate this AI into our products? How can we programmatically configure and/or customize the AI to integrate it into our product and offer it to our users?
What is Amazon Bedrock?
Amazon Bedrock is a service from Amazon Web Services (AWS) designed to simplify the creation and scaling of generative artificial intelligence models. Announced at the AWS re:Invent 2022 conference, Bedrock allows developers to access pre-trained generative AI models from various providers, such as AI21 Labs, Anthropic, and Stability AI, among others.
Las principales características de Amazon Bedrock incluyen:
Access to pre-trained models: It allows users to use language and image generation models that are already trained without the need to manage the infrastructure or the complexities of training.
Customization: Users can adapt these models to their specific needs using their own data, enabling the creation of applications that are more aligned with their goals.
Scalability: Bedrock is designed to be highly scalable, allowing businesses to implement generative AI applications on a large scale.
Integration with AWS services: Bedrock easily integrates with other AWS services, making it convenient to use in existing applications and to implement in broader solutions.
In summary, Amazon Bedrock is a platform that simplifies and accelerates the process of developing generative artificial intelligence applications for businesses.
The purpose of this article is to bring together all the steps needed to set up access to Amazon Bedrock models in one place. Otherwise, one would need to visit multiple manual pages and ultimately run a small example to demonstrate its use.
Setting Up Access to Amazon Bedrock on AWS
Prerequisites
Create an AWS account (if you don’t already have one).
Set up your local environment with access keys or a profile to execute commands via the AWS CLI.
Create an IAM role with sufficient permissions to access Amazon Bedrock’s foundational models.
Request access to the foundational models you wish to use.
In this article, we will assume that the reader already has knowledge of AWS and has an account set up.
Creating a Role in IAM
I will describe two ways to create this role. The first is the standard method, using the AWS CLI in a terminal.
The second is by using a tool for infrastructure as code called
Pulumi
. As engineers, we like to complicate our lives… Initially, I thought about doing it in Terraform since I’m very familiar with it, but then I decided to learn something new and spent a few days experimenting with
Pulumi
. The code I will share is not perfect, far from it, but it works; I promise to improve it as my skills with
Pulumi
develop, as I really enjoyed it.
Using AWS CLI
The role we need must allow for permission delegation, so we will create a JSON file named TrustPolicy.json and add the following content:
This will allow us to subscribe, unsubscribe, or list our subscriptions for foundational models in Amazon Bedrock. From this output, we copy the ARN address because we will use it soon.
Finally, we create the role and attach the policies.
aws iam create-role \
    --role-name Test-UserAccess-Role \
    --assume-role-policy-document file://TrustPolicy.json
aws iam attach-role-policy \
    --role-name Test-UserAccess-Role \
    --policy-arn arn:aws:iam::123456789012:policy/bedrock-fms-access-policy
Just for testing purposes, we will add the full access policy to Bedrock as mentioned in the
documentation
. Otherwise, we should create a policy with granular permissions.
aws iam attach-role-policy \
    --role-name Test-UserAccess-Role \
    --policy-arn arn:aws:iam::aws:policy/AmazonBedrockFullAccess
To verify that it is correct, we describe the role:
Don’t forget to replace the account ID with your own.
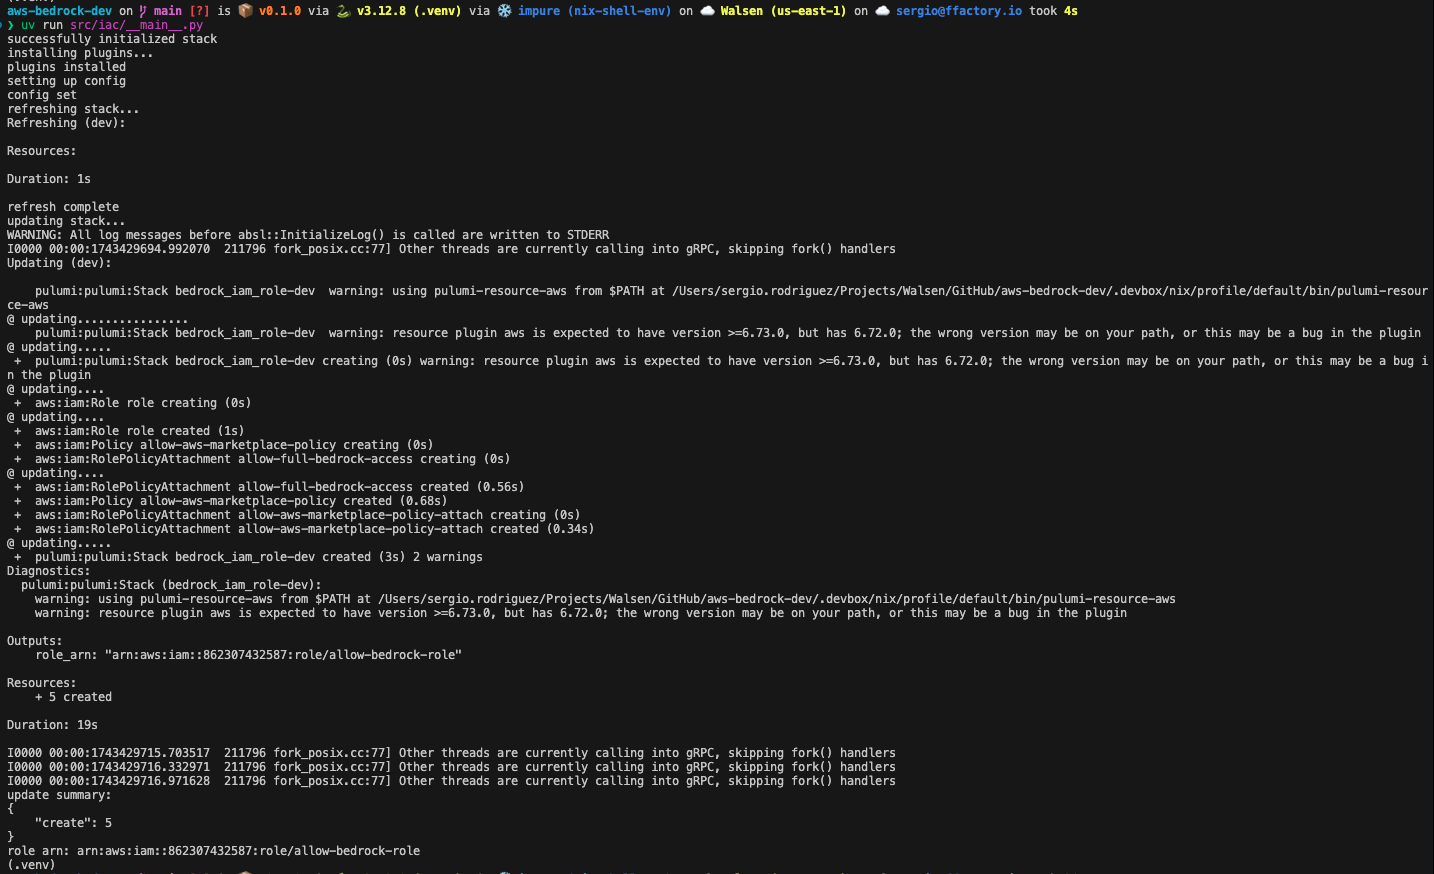
Using Pulumi
The setup to run this solution primarily depends on Devbox; from there, all dependencies and configurations should be handled, except for some environment variables that can be exposed in the .envrc file if you have direnv installed; otherwise, they must be exported manually. For more details, please refer to the README.md.
After executing the Pulumi code, we can see the role has been created:
Role created
AWS Organizations
For an AWS account structure in AWS Organizations with users and permissions managed in a master account using AWS Identity Center, it is necessary to create a Permissions set and attach it to the account where the foundational models will be enabled. Then, we create a group to which we attach the Permissions set, and finally, we add users to the group who will have access to the Bedrock models.
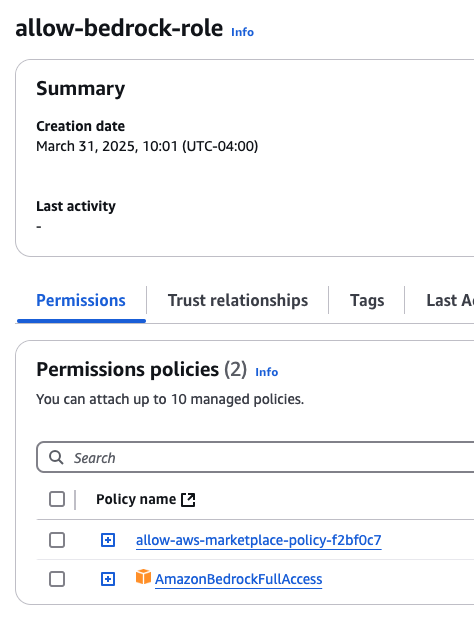
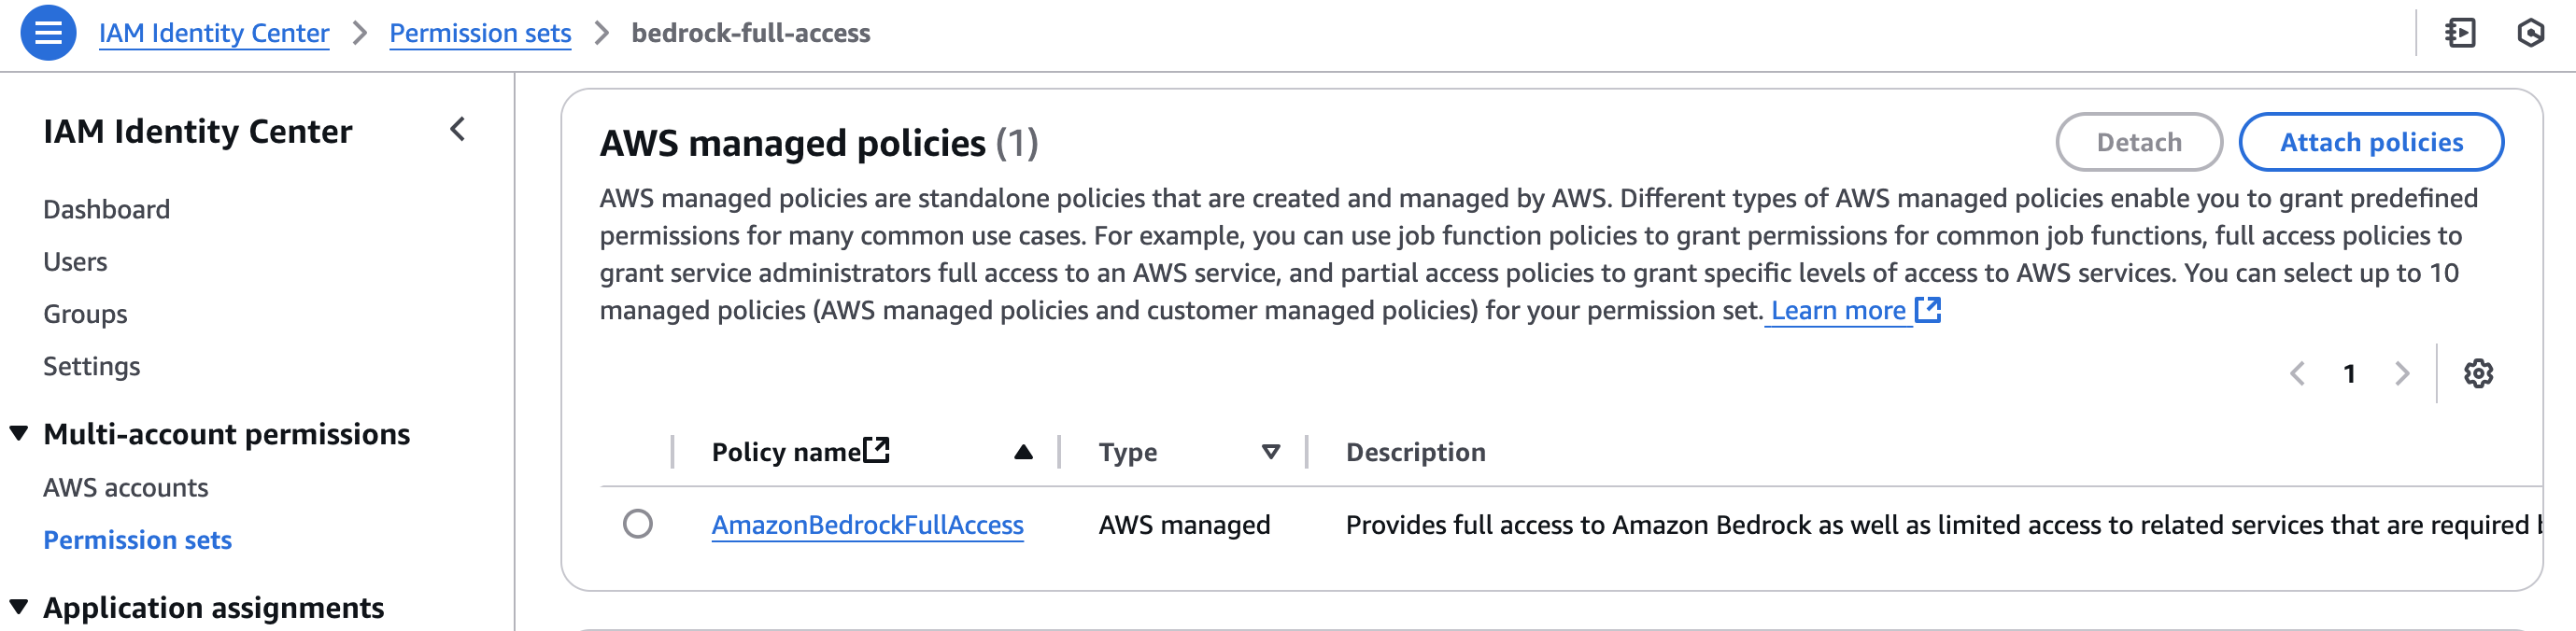
The configuration of the Permissions set should be similar to this, although it’s important to emphasize that this configuration is only for testing; in a production environment, the policy AmazonBedrockFullAccess should not be added, but rather something much more granular that complies with the principle of least privilege.
Managed policies
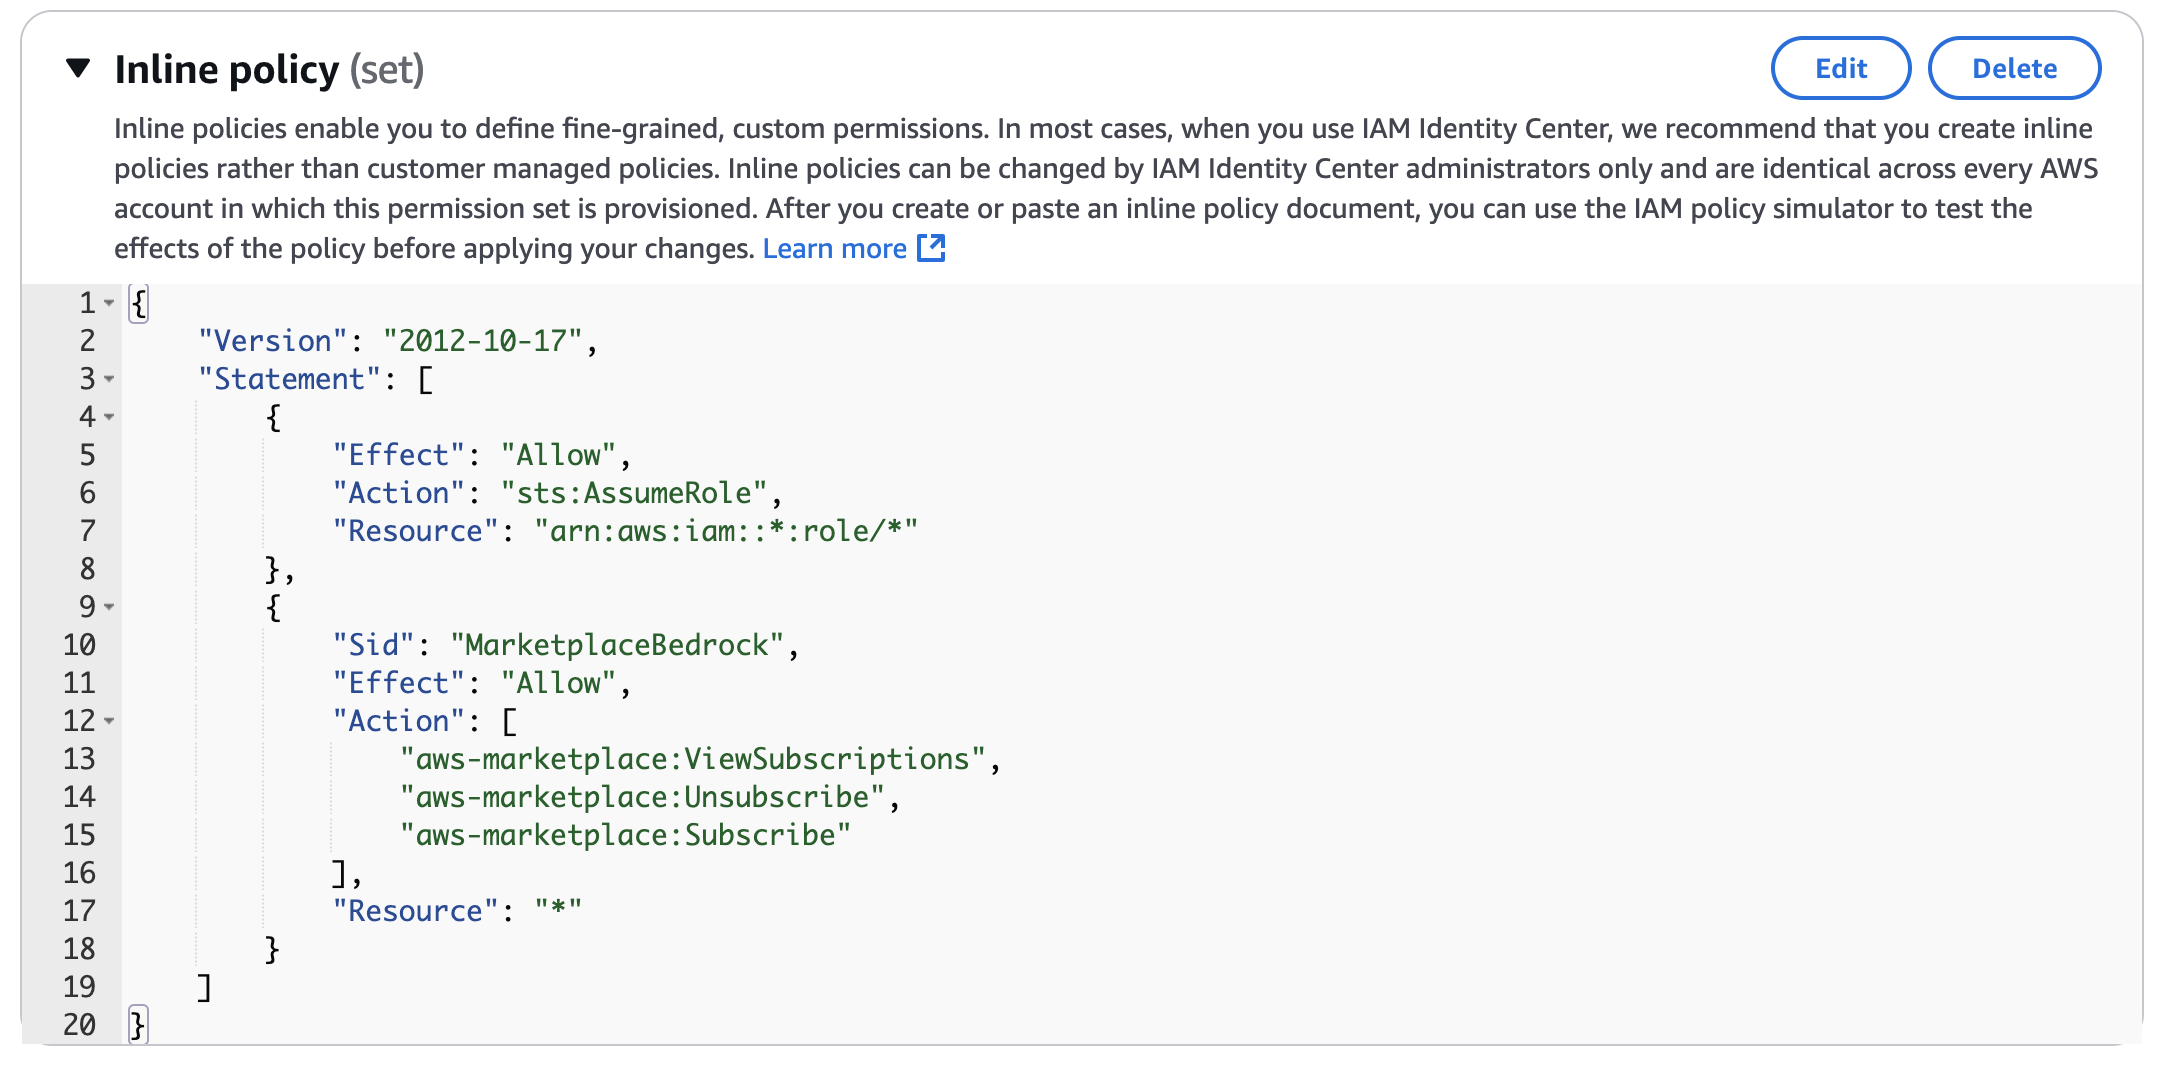
Inline policy
Create a Group in IAM and Add Users
To add a group in IAM, we can execute the following command:
aws iam create-group --group-name iausers
Luego agregamos usuario(s):
aws iam add-user-to-group --user-name Walsen --group-name iausers
You can run the previous command for each user to be added or automate it with a small script that reads the users from a text file.
#!/bin/bash
if[$# -ne 2];thenecho"Usage: $0 <users-file> <group-name>"echo"Example: $0 users.txt Developers"exit1fiUSERS_FILE="$1"GROUP_NAME="$2"if[ ! -f "$USERS_FILE"];thenecho"Error: File '$USERS_FILE' not found"exit1fiif ! aws iam get-group --group-name "$GROUP_NAME" >/dev/null 2>&1;thenecho"Error: Group '$GROUP_NAME' does not exist"exit1fiwhileIFS=read -r username ||[ -n "$username"];doif[ -z "$username"];thencontinuefiusername=$(echo"$username"| tr -d '[:space:]')echo"Adding user '$username' to group '$GROUP_NAME'..."if aws iam add-user-to-group --user-name "$username" --group-name "$GROUP_NAME" 2>/dev/null;thenecho"Successfully added '$username' to '$GROUP_NAME'"elseecho"Failed to add '$username' to '$GROUP_NAME'. User might not exist or you may not have sufficient permissions."fidone < "$USERS_FILE"echo"Process completed!"
If we have used the automated method with Pulumi, it is possible to modify it and add the functionality to create the group if it doesn’t exist and add the users. Currently, that functionality does not exist.
Request Access to Amazon Bedrock Foundational Models
To request access to one or more foundational models, we can follow these steps:
In the AWS console, switch to the previously created role. (We can follow the steps described in the
documentation
for this.)
Switch to the Virginia region if we are not already there (us-east-1).
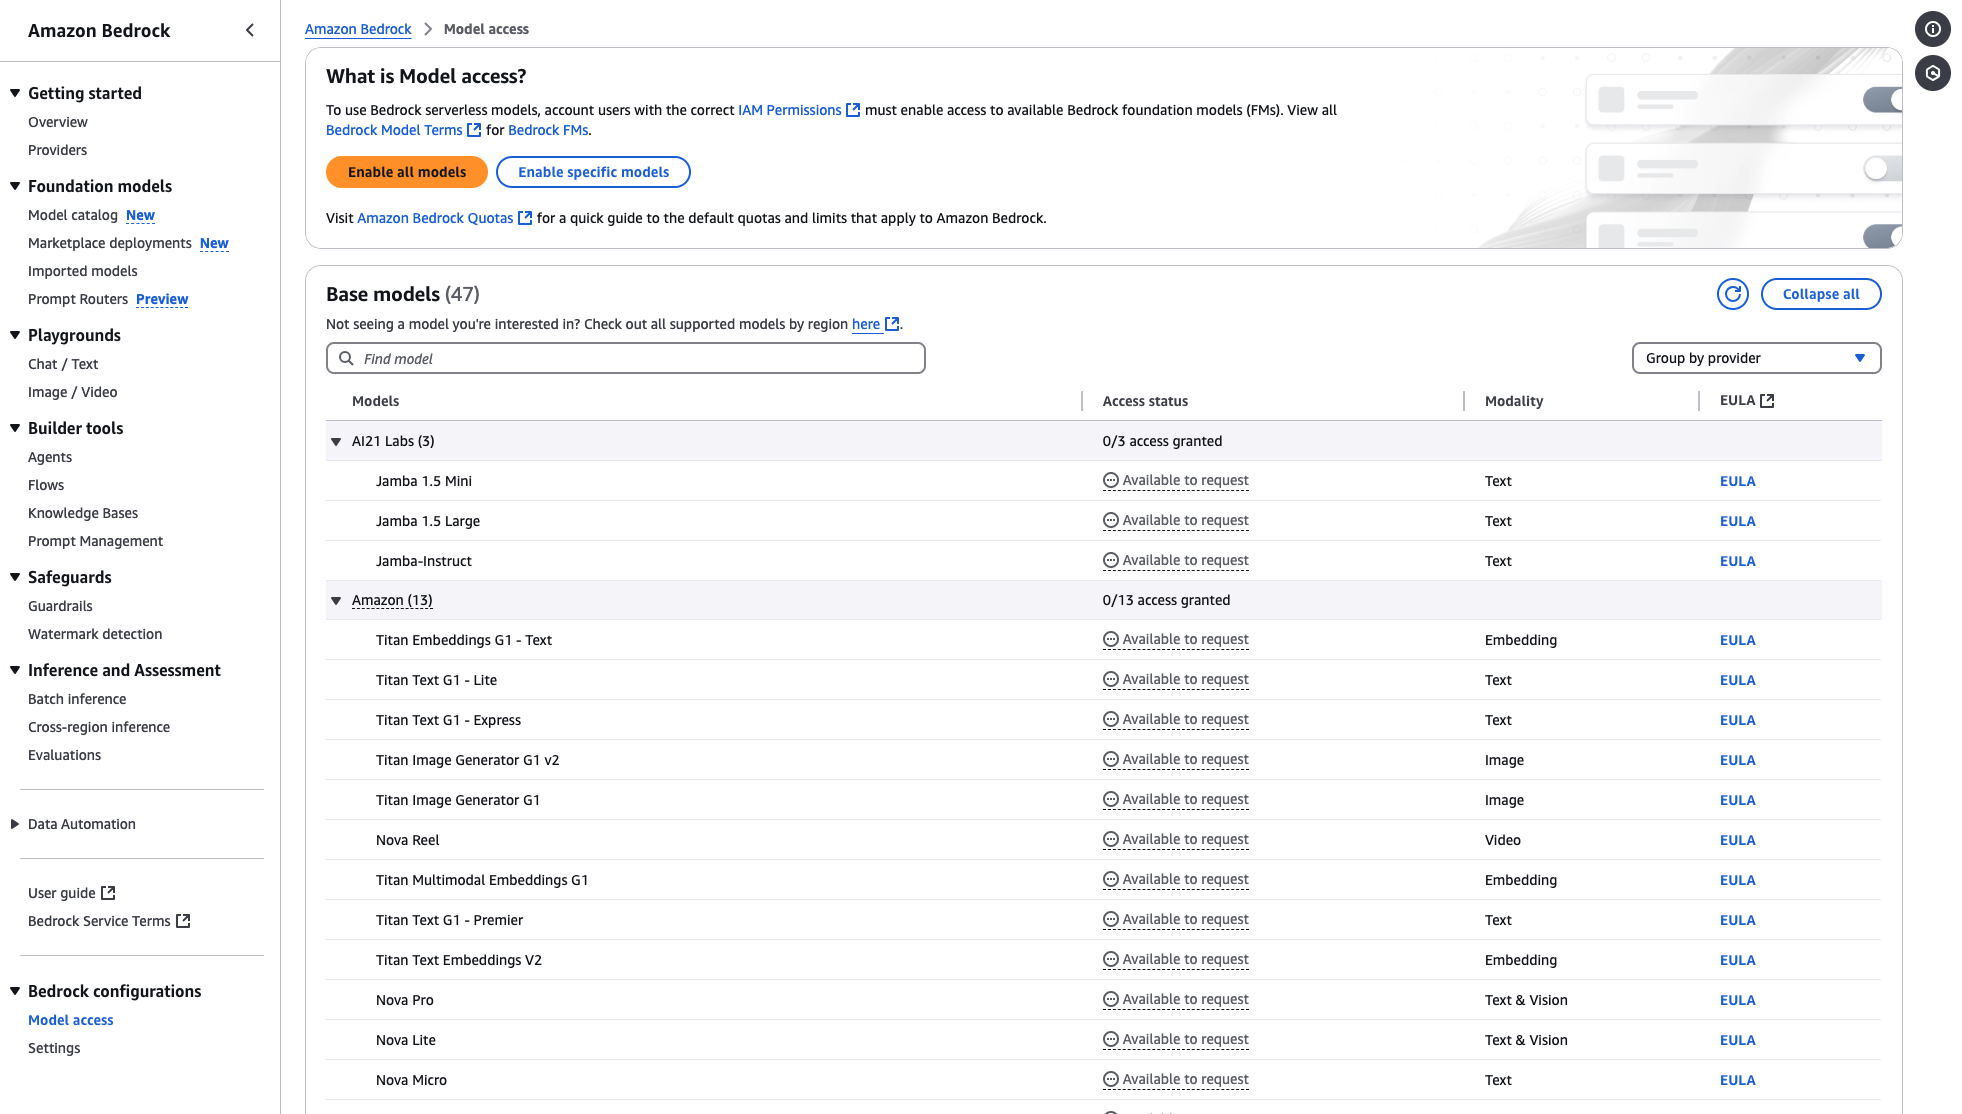
In the bottom left of the menu, look for Access to Models and select it.
List of models
On the Access to Models page, as shown in the image, all the available models in Amazon Bedrock are listed.
For each model in the Foundational Models table, you can review the End User License Agreement (EULA).
To request access to the models, we have the following options:
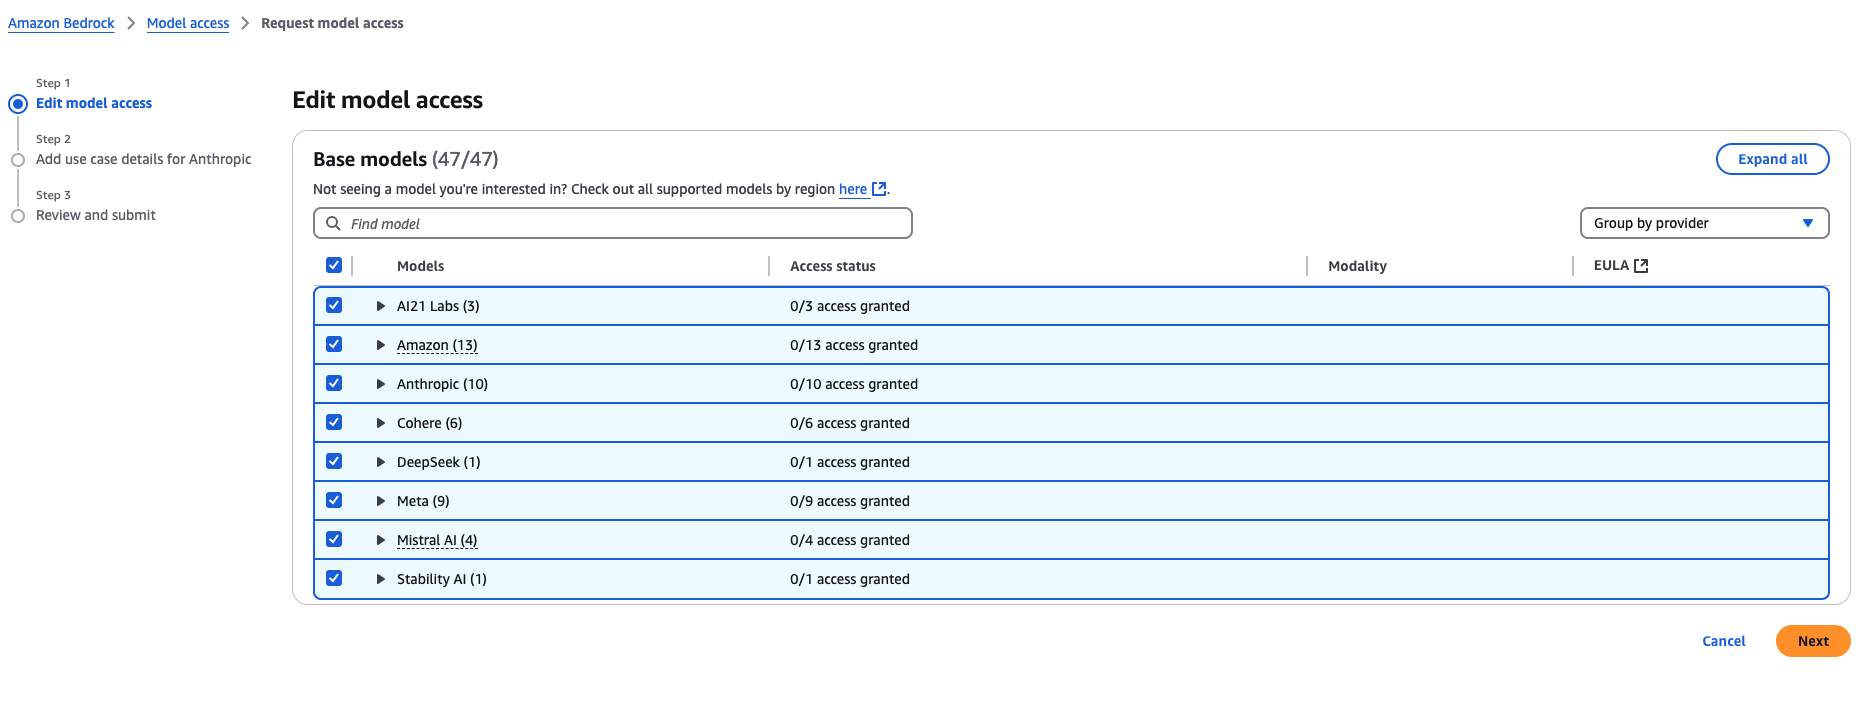
To request access to all models, we choose Enable all models. The page that opens will check the boxes next to all models. Anthropic requires filling out an additional form. We will go this route:
All models selected
To request access to specific models, we choose Enable specific models. On the page that opens, we will have the following options:
To request access to all models from a provider, we select the checkbox next to the provider’s name.
To request access to a specific model, we select the checkbox next to the model’s name.
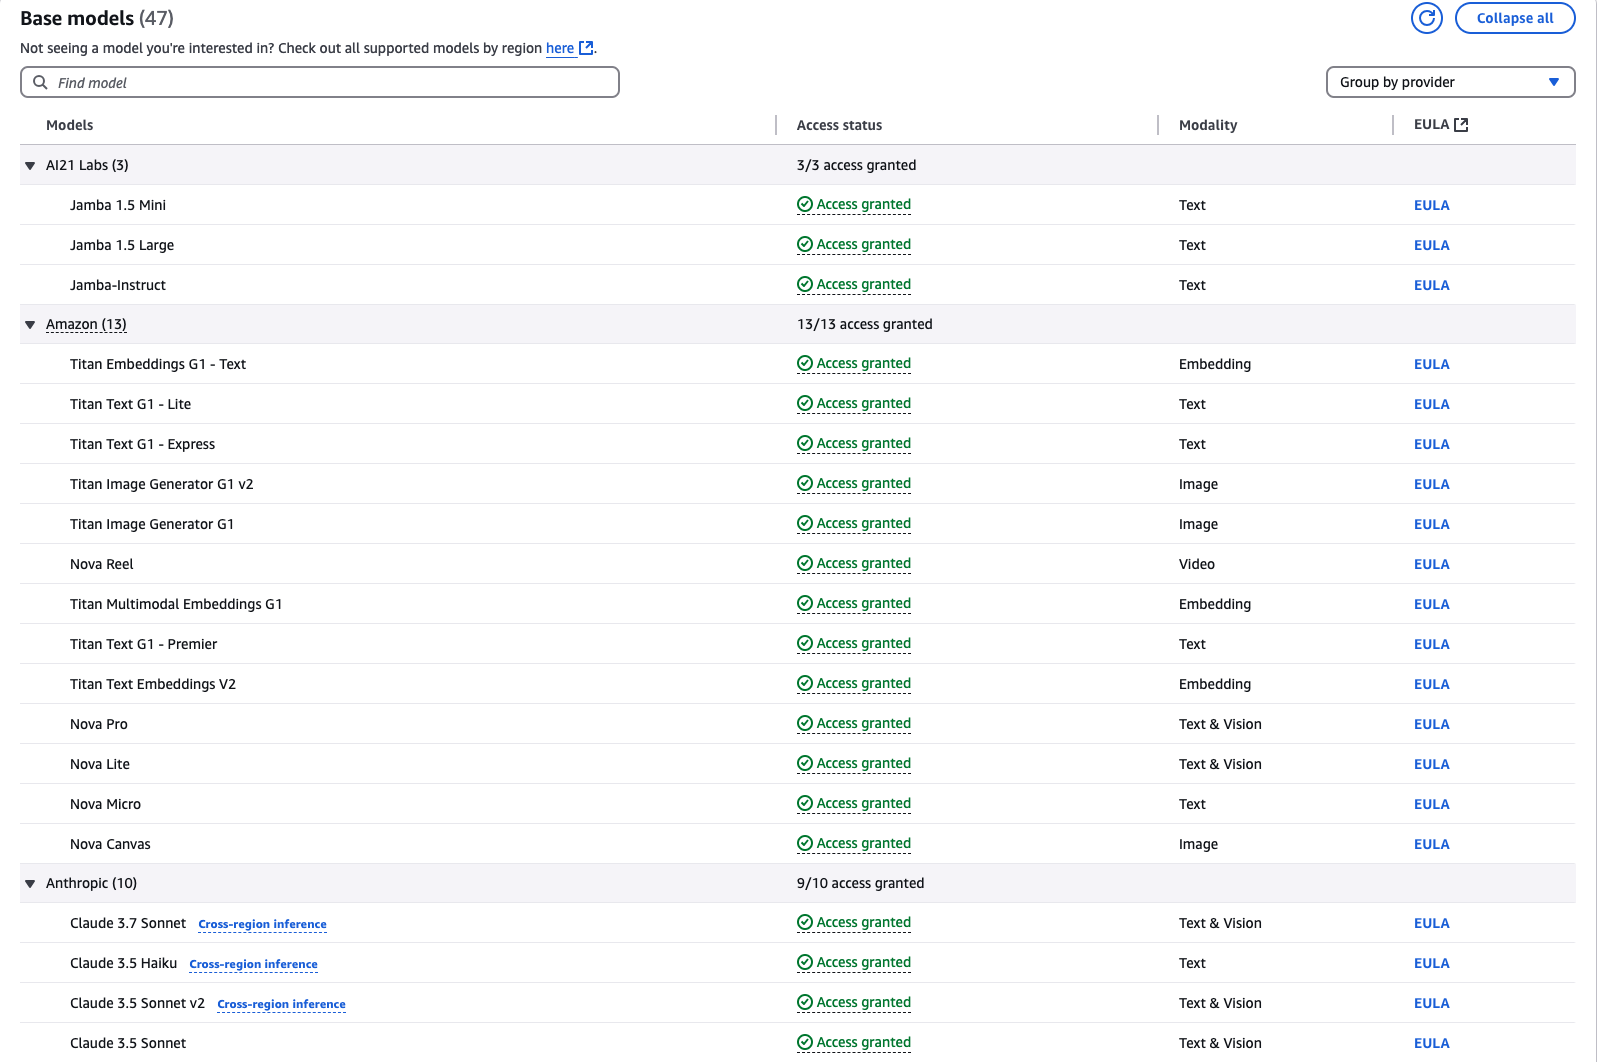
It may take several minutes to obtain access. When access to a model is granted, its access status changes to Access granted.
Access granted
Testing Amazon’s Foundational Model: Titan G1 Large
We have two objectives for this test:
List the available models.
Enter a simple prompt and view the result.
The script we will use is written in Python and has a basic logic with two available methods: one for listing the models and another for executing the prompt.
For communication with Bedrock, we will use the Boto3 library and receive command-line arguments to specify the option we want, using the argparse library for that purpose. Finally, we will use the json library to parse the parameters we send to and receive from the model.
Below is the script:
importboto3importjsonimportargparsedefget_models():bedrock=boto3.client(service_name='bedrock',region_name='us-east-1')model_list=bedrock.list_foundation_models()print("\nAvailable Foundation Models:")print("-"*50)forxinrange(len(model_list.get('modelSummaries'))):print(f"{x+1}. {model_list.get('modelSummaries')[x]['modelId']}")print("-"*50)deftest_amazon_titan(prompt=None):"""
Test Amazon Titan model with a given prompt
"""ifnotprompt:prompt="What is Amazon Bedrock?"bedrock_rt=boto3.client(service_name='bedrock-runtime',region_name='us-east-1')configs={"inputText":prompt,"textGenerationConfig":{"maxTokenCount":4096,"stopSequences":[],"temperature":0,"topP":1}}body=json.dumps(configs)model_id='amazon.titan-tg1-large'accept='application/json'content_type='application/json'print(f"\nSending prompt: '{prompt}'")print("Waiting for response...\n")try:response=bedrock_rt.invoke_model(body=body,modelId=model_id,accept=accept,contentType=content_type)response_body=json.loads(response.get('body').read())print("Response:")print("-"*50)print(response_body.get('results')[0].get('outputText'))print("-"*50)exceptExceptionase:print(f"Error: {str(e)}")defmain():parser=argparse.ArgumentParser(description='AWS Bedrock CLI Tool')parser.add_argument('option',type=int,choices=[1,2],help='Choose option: 1 (list models) or 2 (test Titan)')parser.add_argument('--prompt',type=str,help='Prompt for Titan model (option 2 only)',default=None)args=parser.parse_args()ifargs.option==1:get_models()elifargs.option==2:test_amazon_titan(args.prompt)if__name__=="__main__":main()
Execution
Before running the script, we need to make sure to “assume” the role we created in the terminal. If we used the script in Pulumi, the role name will be different:
If we are in a federated account, we can log into the profile:
aws configure sso --profile bedrock-test
We fill in the input data requested by the script and finally export the profile to the environment, just as we did in the previous option.
From here, we can begin the test.
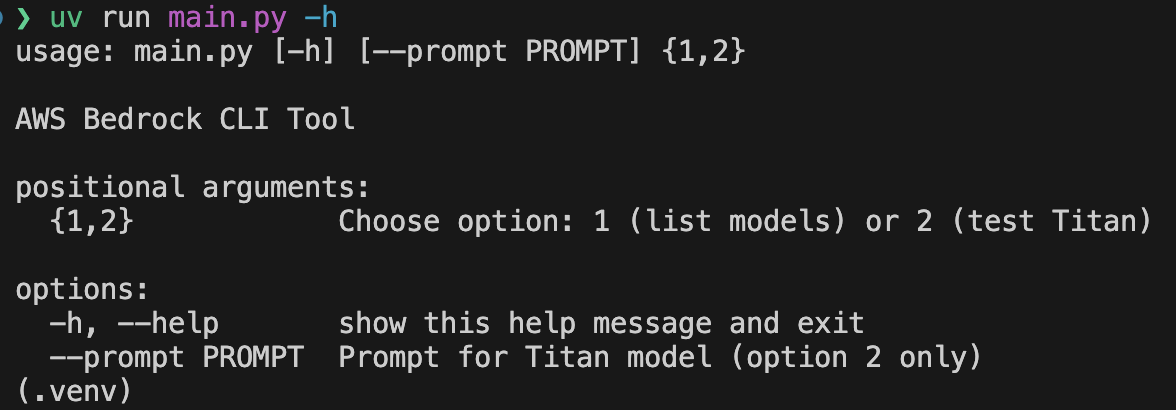
The small script has a help function to show the user the syntax for invoking it.
Script help
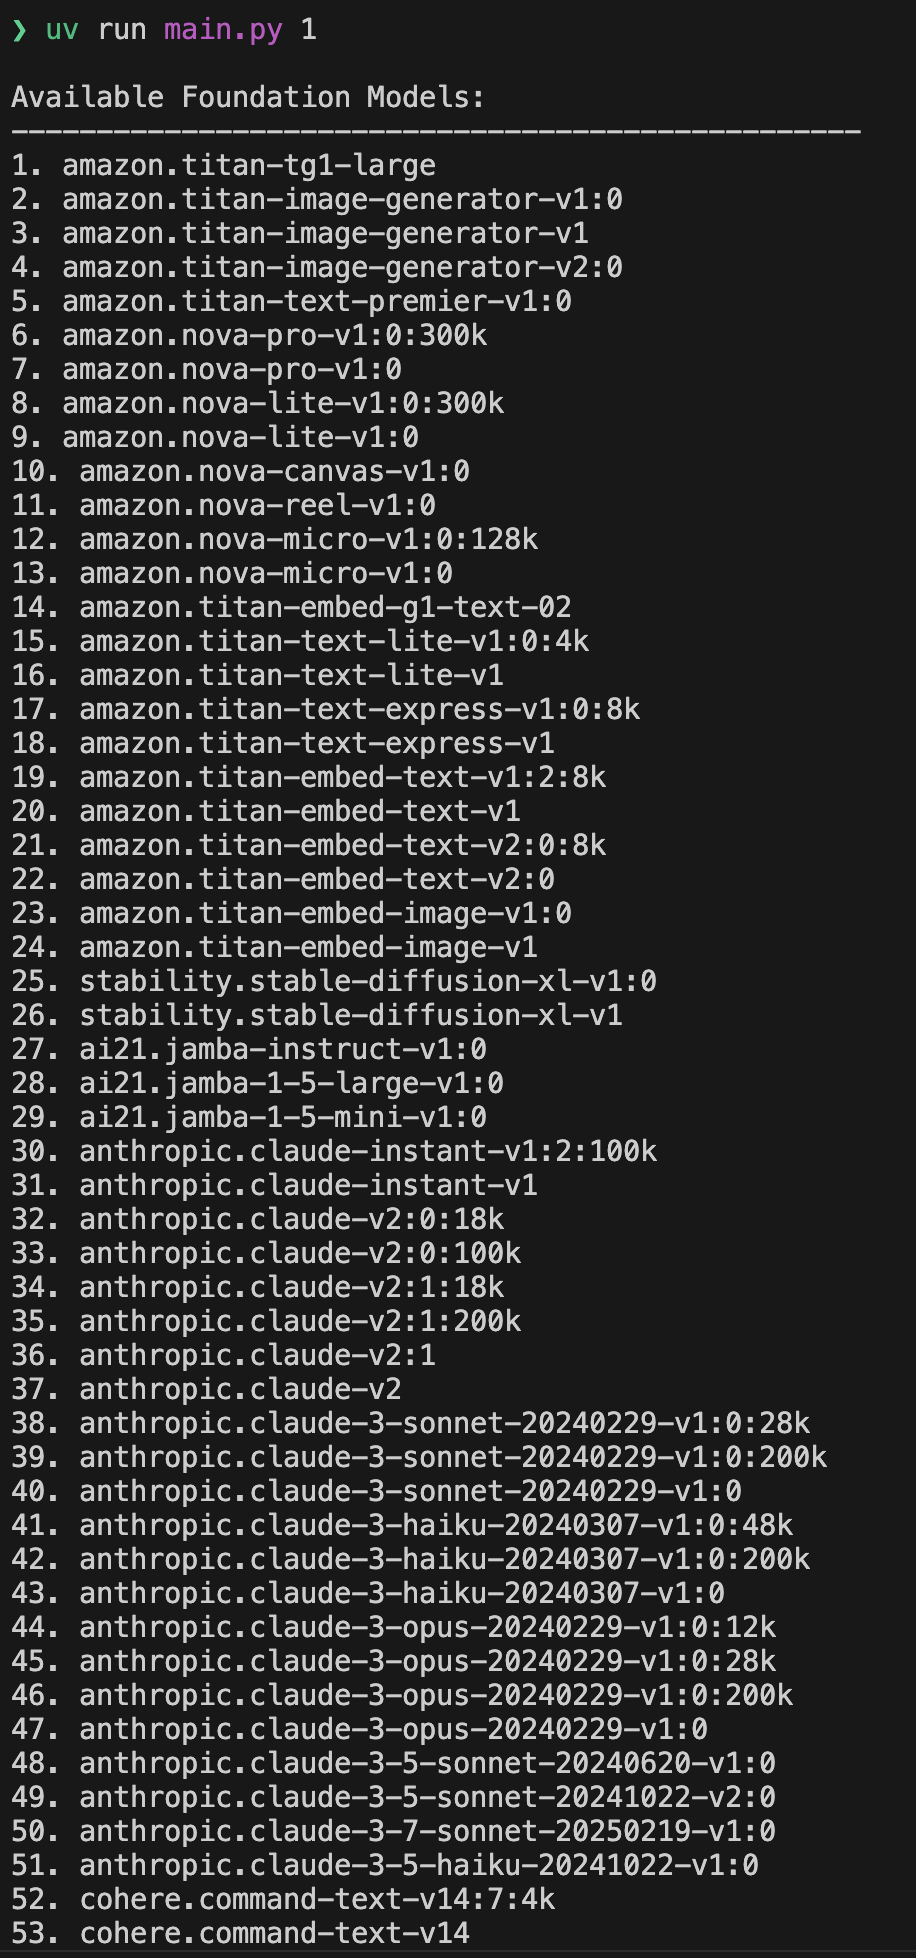
By passing the parameter “1,” we list the foundational models.
FMs List
If we run the script with the parameter “2,” it shows us the output of the default prompt.
Standard Prompt
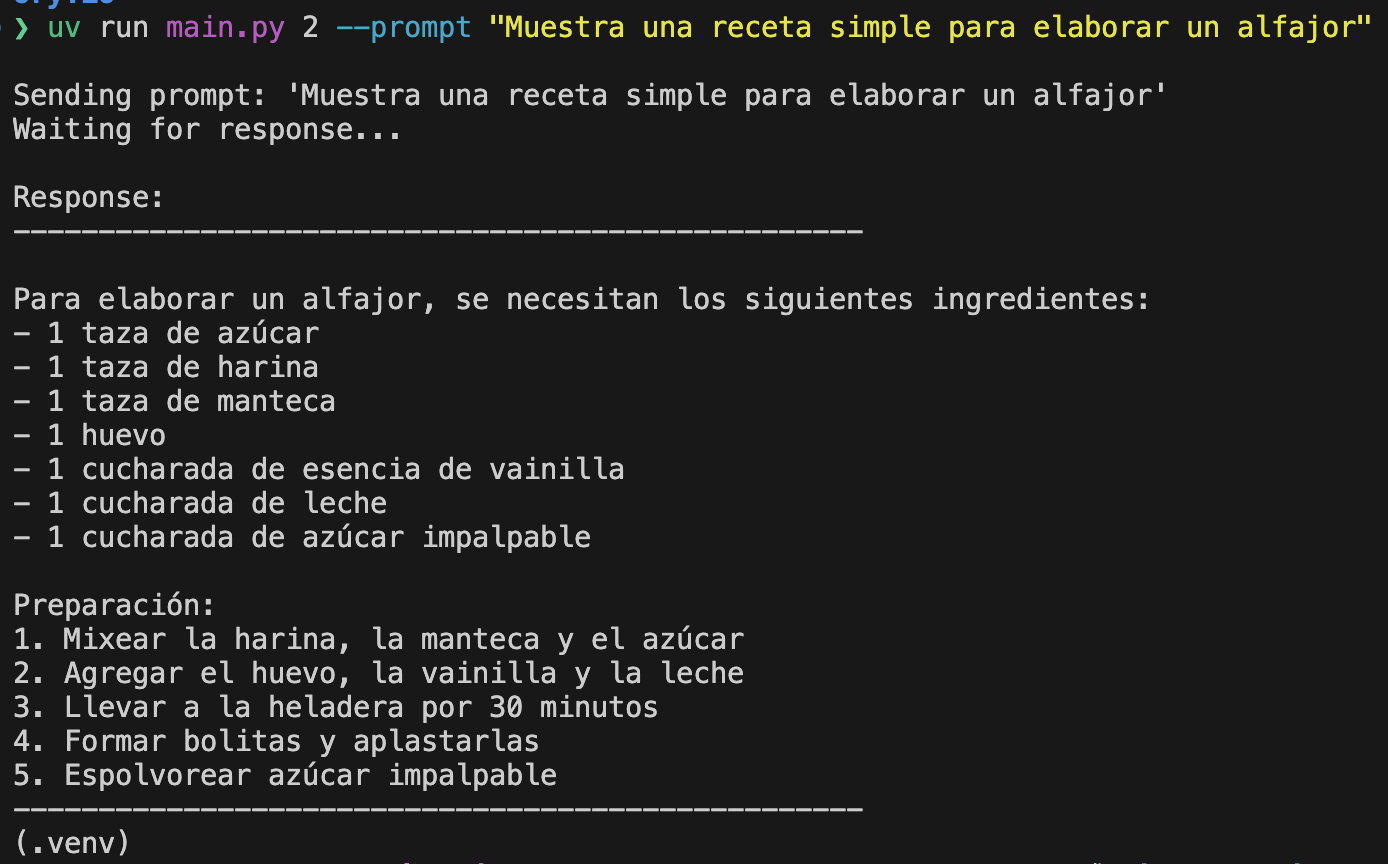
By passing the parameters “2” and “prompt” along with a string of natural language text, we get a customized result. It’s worth noting that we passed the prompt in Spanish, and our output returned in Spanish as well.
Enabling the foundational models is time-consuming; there are many steps to follow and a lot of documentation to consult, but once achieved, Bedrock allows us to interact with many of the best foundational models available today. This is just the beginning. It is true that there are solutions that provide access to platforms where one just needs to drag and drop to have the agent or model ready, but there are many things happening behind the scenes that we don’t see. I’m not saying that this way of creating solutions is bad; rather, I’m pointing out that in exchange for speed and ease of construction, we give up a significant amount of control and customization capability.
Additionally, Bedrock allows us to easily integrate the models with other AWS services. It provides a completely isolated testing area called
Partyrock
where it is possible to create applications simply by entering the prompt in natural language and configuring some options.
The dream of a virtual assistant is very close and goes beyond just that; for companies with complex systems, for the research and implementation of processes, generative AI and agents envision a future that will develop its potential beyond what we ever imagined.